
Star
Adventurer…Fire in the Hole?

The
test I did at home under my 4.5 magnitude Pennsylvania skies were fine, and I
was impressed with its rigidity, ease of motion for fine motor control in
adjusting the altitude and azimuth, and its tracking ability. Setup is relatively easy. Download the Polar Finder app to your
smartphone. Align the mount toward
Polaris and use the built in polar finder and the app to carefully adjust the
view in the polar finder to match the smartphone. It’s the same process with the Ioptron except
the Star Adventurer doesn’t have the play in the mount when adjusting the
altitude and azimuth. When satisfied,
remove the polar finder and put in the camera carefully so as not to destroy
your alignment. It’s now ready to
use. There are various settings, but I
was really only interested in the “star” symbol for tracking in sidereal
time. There is a convenient switch to
set it for north or south.
After
allowing me some time to test it at my house, Dave was gracious enough to allow
me to take it on my trip to the dark western skies of the United States this
past summer. I would use it at the Mars
Desert Research Station in Utah to test out its tracking capabilities, and then
in Montana for the Perseid Meteor Shower.
That was my real goal. If it
worked well enough I wanted to combine images of various meteor streaks onto
one photo fast and simple.
My
first test under dark Utah skies were beautiful, except for one thing. If I didn’t use the intervolometer and relied
on the shutter cable that attaches from the camera to the mount, I could only
get 100 second exposures. I would like
12 minute exposures. At 100 seconds the
images were all fine, and this would work well for the Perseids, but not for
capturing the majesty and beauty of the Milky Way. I allowed the camera to run for well over an
hour. I took the images and stacked them
using a freeware program called Star Trails.
No, I didn’t use CCD Stacker. I
wanted Star Trails. Why? The program simply overlays all of your pictures
and doesn’t adjust them for stacking in any way. This is necessary if you want an image with
star trails. It also will tell me how
well the mount is tracking. The
results? In a word- impressive. The
image below doesn’t show great detail with the Milky Way (each exposure is 100 seconds,
however notice that there is no trailing.
Of course the big thing you do notice is the ground blur from the motion
of the camera. Simply replace that with
a static image as seen in the second image. The next image shows the Moon, the International Space station, a meteor, and an
iridium flare. They all happened within
a half hour of each other. Notice the lack
of star trails. This will be fantastic
for the meteor shower! Unfortunately, a
string of bad weather came in when I wanted to test the longer 12 minute exposures
so it never happened. But my luck wasn’t
just connected to bad weather.


I
have been trying to save the use of the lithium batteries and using the USB /
mini plug which provides power to the unit.
As I went to plug it in one night I noticed that the mini plug had
separated from the housing and was inside the unit. It’s alright.
I can still use it on battery power, which I did to try a time lapse of
my friend Gary and me observing Venus in the daytime. An interesting effect is that the mount moves
side to side during the time lapse. I
had the mount set to the number 6 position which means it takes a picture every
2 seconds if you use the bulb setting. I
didn’t use the bulb setting. I decided
to go with a program setting on the camera since 2 seconds would be too long an
exposure for a daylight image. The
result is very neat for a time lapse, but not always useful. If you want the image to be still you need to
keep the unit turned off.
I
was still concerned about the power plug and decided to see if I could at least
pull it back to the housing. Have you
ever tried to look into a mini plug hole?
It’s small and dark inside and I couldn’t see anything. I thought “If only I had a light.” And as if on cue, the inside of the unit lit
up with a dim yellow light. “Excellent!”
I thought as I peered inside,“They think of everything”. And I could now see everything clearly. There was the metal plug laying across the
circuit board, the glow of the yellow fire was to the right, and I could see
and smell the smoke that started to drift out through the mini plug
opening. I felt like Superman and put
the blaze out with one quick blast of air.
The smoke hadn’t cleared out of the unit yet as I removed the batteries,
and thought…”Damn, well, there goes the Persieds”, and then “Damn, I just
caught Dave’s Star Adventurer on fire!”
I
contacted Sky watcher by email explaining the situation but to no avail. A day or two went by and no response. I was able to place a phone call in town and
left a message. The Mars Desert Research
Station is really remote so we don’t always get good reception and certainly
not phone service. I did discover that
someone tried to call me back from Sky Watcher and that their service team was
out at a convention, but they wanted to talk to me about the problem. I never did get to talk to them in person,
but was able to explain the situation adequately that I received a UPS slip in
my email. I had a box for the unit and
bubble wrapped it. I had no printer-
remember the Mars hab is really remote, but when I finally got to a UPS store
they printed the label from the flash drive I gave them, and secured the box
and shipped. There was no paperwork
needed inside, and no charge. Considering
the odd constraints I was under with lack of communication, I was impressed
with the service department at Sky Watcher.
They stand behind their products and their customers. In about two weeks time, Dave had a brand new star Adventurer which is
now set up in my living room as I type.
Things I liked include the rigidity and performance of the
unit. It was a fast setup and accurate. I also like all of the different
configurations you can use with the attachments. I never did get to try out the counterweight
(didn’t need it), but the Vixen bar that holds two cameras is a real
beauty. We actually used that with two
cameras on a CGEM mount for the Perseids.
Things
I would like to see is a way to change the length of the exposure. If I could increase the exposure without
using the intervolometer that would be ideal.

I
wouldn’t hesitate to take it on another venture, and I look forward to using it for the solar
eclipse in 2017 to take a fisheye time lapse of the sky.

Link to Sky Adventurer time lapse written about in article
Click on video entitled "Musk Observing".
Update
12/1/16
Polar Illuminator Adaptor
So it’s finally happened.
I suppose it was inevitable. But
for the first time in my astronomical career I started to use a piece of
astronomical gear manufactured by a 3D printer!
And the results…INGENIOUS! So my friend Dave Fisherowski, gives me a
round piece of white 3D printer plastic, and asks if I would use and review
this with the Star Adventurer Mount. The
idea is quite simple.
The Star Adventurer is only as good as its polar
alignment. To facilitate this you put
the polar illuminator on the polar finder and align it using an app from your
smartphone. The problem is that after
you make that adjustment, you need to remove the polar illuminator and
CAREFULLY insert the camera without moving the mount and tripod. Typically, the mount is massive enough that
this isn’t too much a problem, but any mistake means you have to go through the
alignment procedure again. Thanks to a
small piece of 3D printer plastic this is now a thing of the past.

Begin by fitting the polar illuminator snugly into the white
adapter. Then attach the adapter onto
the opening of the declination bracket.
It fits perfectly and can only be oriented in one direction thanks to
the tabs on the adapter.

Attach the declination bracket onto the mount being certain
to align the adapter over the lens of the polar finder. Polar align as usual and start
observing.

Clever, easy and fast.
A small piece of plastic just took polar alignment with the Star
Adventurer to a new level.

P.S. If interested in this adapter contact...
Yiwei Daio at diaoyiwei@gmail.com. Latest price I had was $15 each, but subject to change.
Update 7/4/17 From Hanksville, Utah and the Mars Desert Research Station
Easy Polar Alignment
with the Star Adventurer

So let’s go through the procedure step by step.

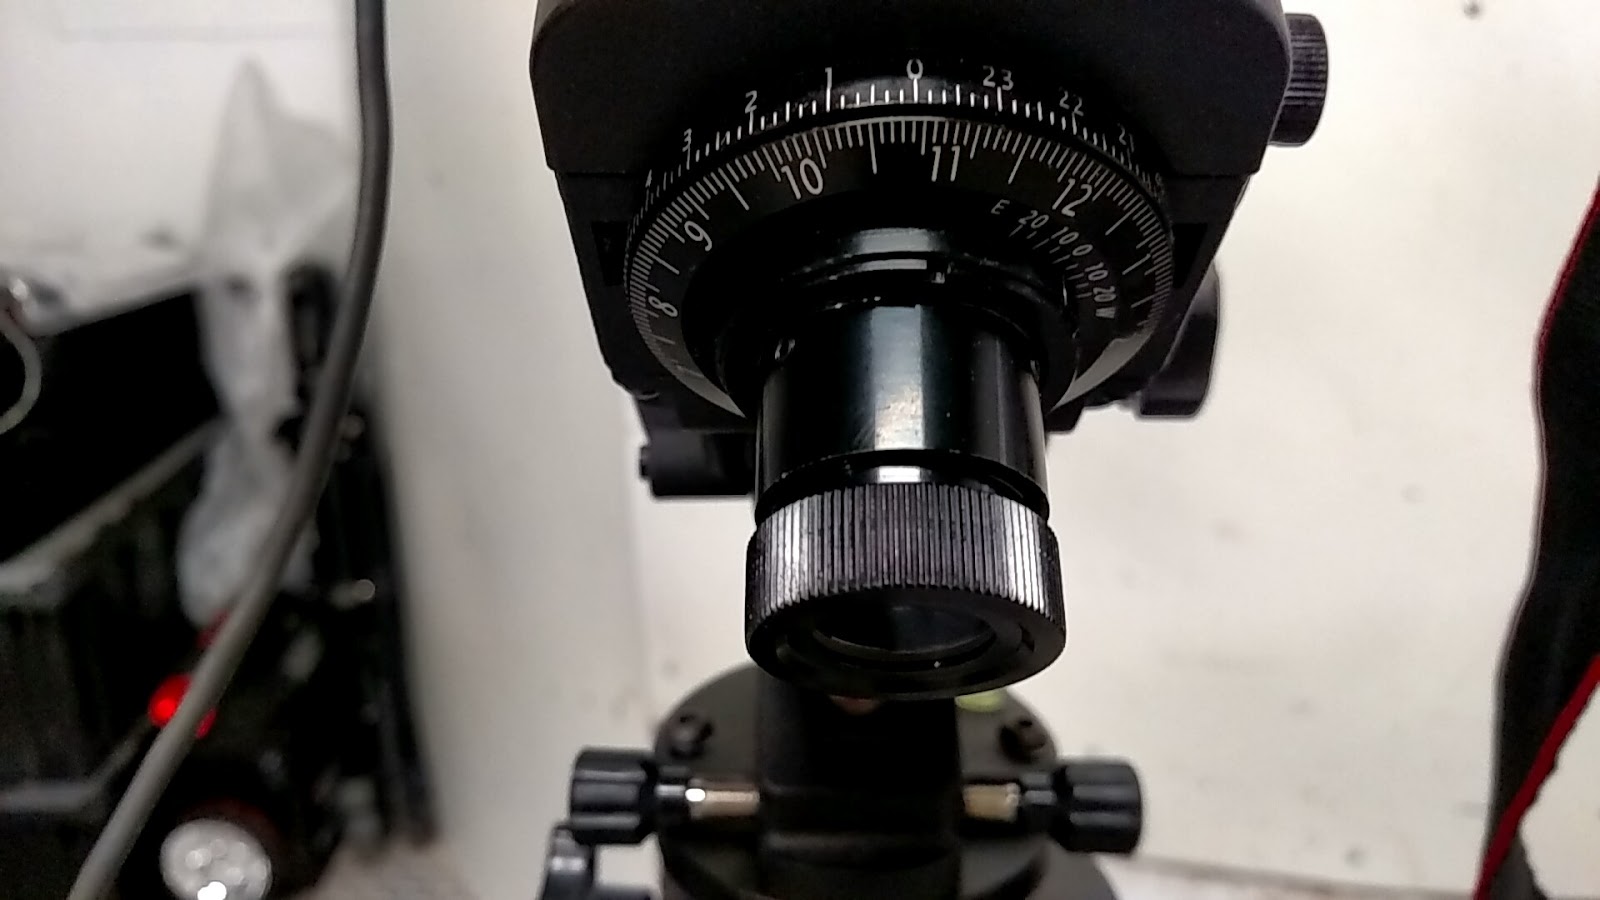
4)
Turn the axis so the dials (date and time
gradation circles) on the Polar Scope read “October 31” (one line before
11). See the picture. This ensures that the “0” and “6” are
vertical when looking through the Polar Scope.

5)
Use the Polar Finder App to discover where
Polaris should be through the Polar scope.

9)
When finished with the Pole Master, close out
the program and disconnect the USB cable.
I leave the Pole Master on, but you can remove it if you wish to shoot
with two cameras. I haven’t tried that
yet.

The Lagoon and Trifid Nebula were taken with a 3 minute
exposure with a 200 mm lens with a Canon 60Da.
The nebulae were less than 10 degrees above the horizon!

Feel free to leave your questions or comments. And a special thank you to Dave for letting
me field test his equipment!
I
have been trying to save the use of the lithium batteries and using the USB /
mini plug which provides power to the unit.
As I went to plug it in one night I noticed that the mini plug had
separated from the housing and was inside the unit. It’s alright.
I can still use it on battery power, which I did to try a time lapse of
my friend Gary and me observing Venus in the daytime. An interesting effect is that the mount moves
side to side during the time lapse. I
had the mount set to the number 6 position which means it takes a picture every
2 seconds if you use the bulb setting. I
didn’t use the bulb setting. I decided
to go with a program setting on the camera since 2 seconds would be too long an
exposure for a daylight image. The
result is very neat for a time lapse, but not always useful. If you want the image to be still you need to
keep the unit turned off.
I
was still concerned about the power plug and decided to see if I could at least
pull it back to the housing. Have you
ever tried to look into a mini plug hole?
It’s small and dark inside and I couldn’t see anything. I thought “If only I had a light.” And as if on cue, the inside of the unit lit
up with a dim yellow light. “Excellent!”
I thought as I peered inside,“They think of everything”. And I could now see everything clearly. There was the metal plug laying across the
circuit board, the glow of the yellow fire was to the right, and I could see
and smell the smoke that started to drift out through the mini plug
opening. I felt like Superman and put
the blaze out with one quick blast of air.
The smoke hadn’t cleared out of the unit yet as I removed the batteries,
and thought…”Damn, well, there goes the Persieds”, and then “Damn, I just
caught Dave’s Star Adventurer on fire!”
I
contacted Sky watcher by email explaining the situation but to no avail. A day or two went by and no response. I was able to place a phone call in town and
left a message. The Mars Desert Research
Station is really remote so we don’t always get good reception and certainly
not phone service. I did discover that
someone tried to call me back from Sky Watcher and that their service team was
out at a convention, but they wanted to talk to me about the problem. I never did get to talk to them in person,
but was able to explain the situation adequately that I received a UPS slip in
my email. I had a box for the unit and
bubble wrapped it. I had no printer-
remember the Mars hab is really remote, but when I finally got to a UPS store
they printed the label from the flash drive I gave them, and secured the box
and shipped. There was no paperwork
needed inside, and no charge. Considering
the odd constraints I was under with lack of communication, I was impressed
with the service department at Sky Watcher.
They stand behind their products and their customers. In about two weeks time, Dave had a brand new star Adventurer which is
now set up in my living room as I type.
Things I liked include the rigidity and performance of the unit. It was a fast setup and accurate. I also like all of the different configurations you can use with the attachments. I never did get to try out the counterweight (didn’t need it), but the Vixen bar that holds two cameras is a real beauty. We actually used that with two cameras on a CGEM mount for the Perseids.
Things I would like to see is a way to change the length of the exposure. If I could increase the exposure without using the intervolometer that would be ideal.

I
wouldn’t hesitate to take it on another venture, and I look forward to using it for the solar
eclipse in 2017 to take a fisheye time lapse of the sky.

Link to Sky Adventurer time lapse written about in article
Click on video entitled "Musk Observing".
Click on video entitled "Musk Observing".
Update
12/1/16
Polar Illuminator Adaptor
So it’s finally happened. I suppose it was inevitable. But for the first time in my astronomical career I started to use a piece of astronomical gear manufactured by a 3D printer! And the results…INGENIOUS! So my friend Dave Fisherowski, gives me a round piece of white 3D printer plastic, and asks if I would use and review this with the Star Adventurer Mount. The idea is quite simple.
The Star Adventurer is only as good as its polar alignment. To facilitate this you put the polar illuminator on the polar finder and align it using an app from your smartphone. The problem is that after you make that adjustment, you need to remove the polar illuminator and CAREFULLY insert the camera without moving the mount and tripod. Typically, the mount is massive enough that this isn’t too much a problem, but any mistake means you have to go through the alignment procedure again. Thanks to a small piece of 3D printer plastic this is now a thing of the past.

Begin by fitting the polar illuminator snugly into the white adapter. Then attach the adapter onto the opening of the declination bracket. It fits perfectly and can only be oriented in one direction thanks to the tabs on the adapter.

Attach the declination bracket onto the mount being certain to align the adapter over the lens of the polar finder. Polar align as usual and start observing.

Clever, easy and fast. A small piece of plastic just took polar alignment with the Star Adventurer to a new level.

P.S. If interested in this adapter contact...
Yiwei Daio at diaoyiwei@gmail.com. Latest price I had was $15 each, but subject to change.
Update 7/4/17 From Hanksville, Utah and the Mars Desert Research Station
Easy Polar Alignment
with the Star Adventurer
So let’s go through the procedure step by step.
4)
Turn the axis so the dials (date and time
gradation circles) on the Polar Scope read “October 31” (one line before
11). See the picture. This ensures that the “0” and “6” are
vertical when looking through the Polar Scope.
5)
Use the Polar Finder App to discover where
Polaris should be through the Polar scope.
9)
When finished with the Pole Master, close out
the program and disconnect the USB cable.
I leave the Pole Master on, but you can remove it if you wish to shoot
with two cameras. I haven’t tried that
yet.
The Lagoon and Trifid Nebula were taken with a 3 minute
exposure with a 200 mm lens with a Canon 60Da.
The nebulae were less than 10 degrees above the horizon!
Feel free to leave your questions or comments. And a special thank you to Dave for letting
me field test his equipment!


12)
Focus the Canon 60Da as you normally do.
With the lens at 200 mm find a bright star, center it and zoom in to 10x
to achieve a fine focus.


A very interesting and helpful read. Thank you
ReplyDeleteThe number zero on the time graduation circle should line up with the large graduation between the 10 and 11 marks on the date graduation circle, not "one line before 11".
ReplyDelete